Pages

Saturday, 24 September 2011

It's Footy finals time

We are at the exciting and nail-biting end of the football finals here in Victoria, with the AFL (Australian Rules Football) Grand Final happening next Saturday, 31st September. As I was watching the semi-final last night on TV, lamenting my team Hawthorn going down by a heart-breaking three points to that much hated team Collingwood, I was also sort of contemplating what I should blog about this week. So with football on my mind, it seemed sensible to dedicate this to all the football jumpers I have knitted before (or at least the still ones around to photograph).

When the kids were little, I made them each of them a football jumper. The girls barrack for Geelong football club like their father. Supporting Geelong is compulsory in my husband's family. It's genetically coded into their DNA and I'm sure the Geelong supporter's kit is supplied with their birth certificates. However, I vividly remember taking my eldest daughter to her first AFL football game and her barracking loudly for the umpires rather than either of the teams. She felt she should cheer for them as every one else was being nasty to them.

The girls' jumpers were one of my few attempts at machine knitting. I inherited a hand me down knitting machine from an Auntie. The knitting macine was always a little cantankerous and inclined to jam at inopportune times, so this is one of the few fully complete things I can remember doing with it. These jumpers are made out of 8 ply acrylic yarn and were sort of made up as I went along as I didn't have a pattern.

Of course you need to have the number of your favourite player on the back of your jumper. The eldest daughter wanted number 32 on her jumper, the number of Garry 'Buddha' Hocking. Buddha was a colourful player with a massive curly mullet and a hard-as-guts playing style, often leaving his opponents slightly the worse for wear after bruising encounters. It's probably not surprising that the photo I found of Buddha has him slightly blood splattered. However, Buddha was just at the end of his career when I made this jumper so she compromised on Number 36, her second favorite player.
The back of the jumper

Garry Hocking once changed his name to Whiskas for a week for a sponsorship deal
The other daughter, Mel, had Gary Ablett Snr's number 5 on her jumper. Gary Ablett was 'God' to Geelong supporters. He was a fantastic player, capable of the spectacular mark, the sweeping run down the wing and the miraculous goal. However, when you think about it, it is somewhat scary that my girls' favourite players were nick named Buddha and God. There was definitely something semi-sacrilegious going on at Geelong in the early 90's.

The eldest daughter's jumper ended up as 36, as this was the initial  number of Ben Graham, her second favourite player who was the Geelong Captain before he retired and went off to become a punter in the NFL in America. (Though by the time Ben was Captain, he was number 7). Both the girls had their Geelong caps signed by him. Ben was an awesome kick, often kicking half the length of the field, regardless of whether he was playing forward or in the backline.
Ben Graham being chaired off after his last game

There was also a slight chance that the number on the girls' Geelong jumpers would be a 1/2 as this is the number on the jumper worn by the Geelong football club mascot, Half Cat. Getting hugged or high-fived by Half Cat is awesome.

However, when the son came along, I had a win, managing to brainwash (sorry persuade) him to barrack for the same team as me, Hawthorn.

His second footy jumper was hand knitted from a pattern clipped from a magazine. It is knitted on 4 mm needles in 8 ply acrylic yarn.
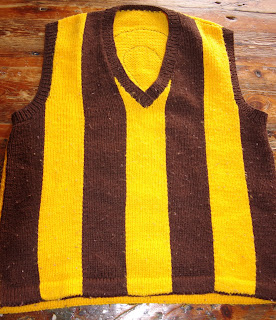
The front of the jumper
The pattern. The jumper on the right is a rugby league jumper

The boy has a number 2 on his jumper. This was Nick Holland when I first made the jumper and in the current team line up it is Jarryd Roughead. Both are centre half fowards, good marks and strong if occasionally inaccurate goal kickers. When Nick retired and the number was passed on the Roughead, the boy saw no need to change his number. (It probably helps that Roughhead is from our general area and played for the Gippsland Power Under 18 team).

You need to have a tough skin if you are a Hawthorn supporter as everyone else picks on you about the ugliness of the colour combination of the Hawthorn jumper. There are also nasty toilet humour comparisons made about what else is yellow and brown.

Close up of the most laughed at jumper colours in AFL football
However, out mascot, Hawka, is awesome.


The kids have grown considerably since I knitted these jumpers and at least one of them now has a 'real' football jumper. The boy was sitting on the couch with me last night, sort of watching the football from behind a cushion whenever the tension got too much, and said it was about time I knitted him a new football jumper. However he wants an away strip one. How do you fancy my chances of pulling this one off?
Jo-ann

Sunday, 18 September 2011

An Infestation of Cats
For some reason, my house seems to have become infested with cats. Not the real variety, though there is one real one who thinks it owns us and deigns to live in our household and demand attention, food, worship and the Head of the Household's chair (even if he is trying to sit in it). No, I mean cats of the stuffed and knitted variety.

Two of them in particular have been hanging out in the lounge room the last few weeks demanding their turn in the spotlight so they get to be the stars of this post. Here are Flat Cat and Ami.

From left: Flat cat and Ami
I have to admit I didn't knit Flat Cat. He is the Head of the Household's work. My mother in law, having only sons, taught them all to knit. Occasionally (I think just to prove he still can) the other half knits something.  I did however sew Flat Cat up and stuff him.

Flat Cat is a very easy knit (but a fair bit trickier to sew up), as he is made up from a series of knitted garter stitch squares and has minimal shaping. His pattern comes from a book my mother gave my kids when they were first learning to knit: The Australian Women's Weekly: Knit a Square and Make a Toy. This is such a great idea. Everyone who first learns to knit tends to make garter stitch squares and short of making a granny rug out of them, what else can you do with them? As well as the cat, the kids made a duck, a mermaid and about half a parrot...


Flat Cat Flat out on the table
Flat Cat's front
Flat Cat's back

Flat Cat's very existence appears to periodically offend the real cat and so Flat Cat required some injury repair and rehabilitation recently after the cat decided to 'kill' him somewhat enthusiastically and leave gaping holes in his limbs. Oh well, it gave me a chance to practice my darning skills. (Thanks to my Oma and my mum for having the patience to teach me to darn. I still darn the work socks that seem to develop holes in the toes whilst still brand new everywhere else).


Darned arm: Complete with Gravy spot due to son photographing cat on dinner table after a roast dinner!
Reattachment of tip of tail
The real cat, Cara - contemplating killing the photographer
Ami (short for amigurumi) was my first ever attempt at making an amigurumi. "Amigurumi is the Japanese art of knitting or crocheting small stuffed animals and anthropomorphic creatures. The word is derived from a combination of the Japanese words ami, meaning crocheted or knitted, and nuigurumi, meaning stuffed doll" (Wikipedia). Amigurumi are typically crocheted tightly in a spiral or in the round. When I was hunting the internet to find a pattern for something cute, I kept coming across this particular cat, Amineko. Ami means crochet and Neko is cat in Japanese. Two things put me off initially though, the pattern was in Japanese and whilst there was an English translation it used diagrams and I'm used to written instructions. I'm also nowhere near as competent crocheter as I am a knitter. However, I figured the only way to see if I could do it was try.

Here is the Japanese Language Home page for Amineko's creator, Nekoyama. A link to the Amineko pattern can be found on the right hand side of the page (it's in English). Nekoyama asks that people who link to the pattern don't link to it directly and I'm respecting her request. The English page has diagrams and clear photos of every step of the process can be found on the Japanese page. Whilst there are other people on the internet who have translated this pattern into English (and are often trying to charge for it), we should respect people's copyright and use the original.

Part of the charm of Ami is how he is stuffed. Only his hands and feet are stuffed with the rest of the limbs including his tail left un-stuffed to allow him to be poseable. The base of the body is stuffed with pellets which allows him to easily sit on any surface.
Amineko even has his own book these days
 
There is sort of internet tradition of photographing your version of Amineko in weird and unusual positions. See the Flickr Stream Amineko's World for examples. So with special thanks to my son the photographer, here are Ami's adventures...

Just Hanging Around
Lemon Tree very pretty...


BFF Forever

Sunday, 11 September 2011

The George Substitute

My little sister loves George O'Malley from Grey's Anatomy. I think she is a tad obsessed and I know she cried profusely when the character dramatically died. (I'm seem to remember there was also some swearing and vowing never to watch the show again).

So what do you do for an obsessed 20 something year old sister when you can't send her the real George gift wrapped for Christmas as she requested on her Christmas wish list? Make a cuddly substitute of course.
George in his cute blue scrubs
The basic doll. Notice that it is not anatomically correct.
(He has no fingers or toes). However, his arms do move!
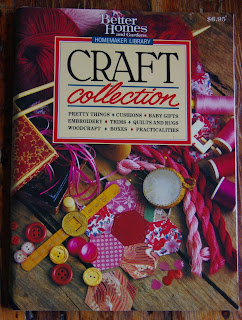
 I deliberately didn't go for an adult looking doll as I wanted cute and cuddly and hug-able. This doll pattern was taken from Better Homes and Gardens: Craft Collection (pictured below). As you can see below, the original doll pattern is actually for a Japanese girl doll. I have actually knitted this pattern twice and both times, it has ended up being a male doll. When my son was about two, he decided he needed a doll because his sisters had lots and so I made Man. Man was a brown doll with curly black hair and removable clothes, a knitted T-shirt and pants. My son carried him around everywhere, however, the doll was usually naked. He had mastered removal of clothing but not re-dressing.One day however, Man got left in the hardware store leading to an inconsolable small boy and a frantic retracing of our steps. But Man was gone. I often wonder who picked up a naked knitted boy doll and where he ended up. I do still have the clothes though!

This is the basic doll pattern I used to make George. Notice that the George doll has had a gender change!
This doll pattern is a quite a good pattern for novice toy knitters as there is not a lot of fiddly sewing up. The legs, body and head are knitted in one piece, then the soles of the feet and the arms. George's finished height is about 40 cm tall. George was knitted using flesh and pale blue 8 ply acrylic yarn, using a set of four 3.25 mm needles as the body and head are knit in the round like a sock. The arms, legs and soles of the feet were knitted using only two of the needles. The scrubs are adapted from a pattern for a jumper and pants for a similar sized teddy bear.
Close-up of the eye. These hand embroidered eyes are child safe and allow much more realistic expressions.
Instructions for embroidered eyes of various sizes
The hardest parts of making any knitted doll 'live' so to speak are the face, particularly the eyes, and the hair. I often used embroidered eyes on my knitted dolls. This is for two reasons. The first is that they are child safe. The second is that you can produce a quite realistic eye. The basic inspiration for these knitted eyes comes from a book I picked up one day second hand at a Sunday market; Easy to Make Knitted Toys by Joy Gammon. The Harry Potter doll has the same types of eyes. You just scale up to the size of the face, by using thicker or thinner wool or embroidery cotton to embroider with. The eye is constructed using a combination of small chain stitches and back stitch. A subtly variegated wool can give a really interesting iris.

Unfortunately, these days, George has pride of place on a high shelf as my sister's dog eats toys for fun and he is too precious to chew.

Wednesday, 7 September 2011

Melissa = Bee

Close up of the Melissa jumper
When we named our middle daughter Melissa, we didn't really know what it meant. We just liked how it sounded. Later, however, we found out that Melissa is a Greek name, meaning honey bee. (Alternatively, it means red rose in Persian). Melissa is the feminine version of the name of a legendary King of Crete, Melisseus. In Greek myth, Melissa is also the name of a princess of Crete who was turned into a honey bee after learning how to collect honey.

So perhaps it is not surprising that Mel had a slight bumble bee collecting fetish when she was younger. The first bee related thing I made her was the Melissa jumper partially pictured above complete with hand embroidered bees. (I like the little bee instead of a dot on the 'i'). (Even though this little jumper hasn't fitted Melissa in about 10 years, it is still carefully stored in the precious potential knitted heirloom box. One day, I might turn it into a cushion).

I wanted to make something three dimensional though, a little knitted or crocheted bumble bee type creature. So I went hunting for inspiration...

This is Bazill the Buzzing Bumble Bee - free pattern here
Hello Kitty in a bee suit complete with bugs and butterflies. Mel is also a Hello Kitty fan.
Alexa - an Amigurumi Bee Girl - pattern by Mia Zamora Johnson. Pattern available from the Ravelry Pattern store, Mia's Etsy shop or visit Mia's blog Owlishly

So I eventually decided it was going to be something in a bee suit. So here is a Bear in a Bee Suit. The basic bear body comes from a pattern from Debbie Bliss. (In fact, it is the same basic bear as the ballerina bear from last post). The head, arms, legs and ears are knitted using an eight-ply acrylic multi-dyed yarn on 2.75 mm needles. The body is knitted in stripes of yellow and black. I designed the hood so that it can be pulled up over the teddy's ears or left loose. It is only attached at the neck edge. The antenna are made from tightly rolled knitted strips with tiny knitted woolen balls at their tips. The bears body is fully movable with jointed arms and legs.

For his photo shoot, the bear decided to pose in my garden with the emerging spring bulbs.


Possibly someone should mow the lawn!