I hate it when I come in here and have to push my way through the massive spiderweb someone's built blocking the doorway. (Where did that come from? I'm sure I've never knit any spiders). Pardon me while I spit out some spiderwebs and brush them out of my hair and off my glasses. There may well be some dust bunnies breeding in the dark corners too but I get that. Bunnies do breed like bunnies and I've certainly knit enough of them over the years to have a substantial breeding colony of the things.
It looks like I may have been neglecting my little corner of cyberspace just a little. A tiny, incy weeny tad (or something). Let's just get a broom and a mop and bucket and clean up a little in here, why don't we? There, all neatly spick and span again.
Now, I really did come in here to show you things. (Actually I got pushed in...) I have been creating lots and lots and lots. I have one, no two, three, four (and possibly some more) new knitted finished objects to share with you. I've been so busy knitting and crocheting away (and working flat out, but let's not mention that) that I've forgot to give each happy little knitted object a chance to recount its journey and shine. They may have got a little bolshi on me demanding little creatures. So here I am to do their bidding.
Remember how back on New Year's Day my daughter and I dyed some beautiful yarn? With food colouring and tea and coffee and microwave?
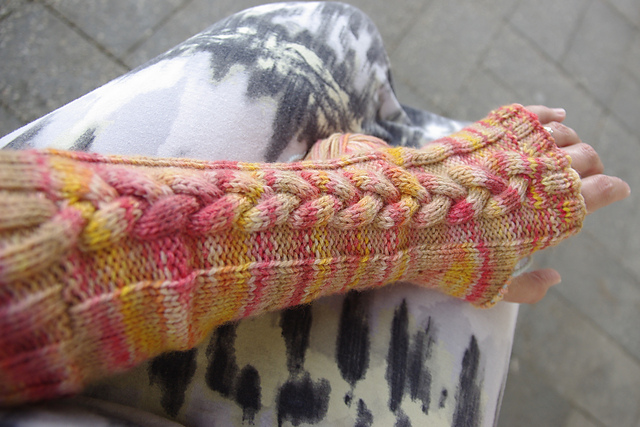
She commissioned some elbow length cabled gauntlets. She settled on Lady Jane Grey's Gloves by Sarah Lady. These are elbow length with a plaited cable on the the top and shaped to fit the arm.
These were one of my first projects for February COM (Cast on Month). The idea is to cast on something new for every day of the month of February. I didn't quite make it but it was an awesome ride along the way. The first glove wasn’t exactly smooth
sailing. I had to use 3.75 mm rather 3.5 mm as suggested in the pattern. (3.5 mm
is not a standard size in Australia). The I misinterpreted the instructions
for the placement of the thumb gusset and got to the top of the gusset
before realizing I had to frog back about 18 rows and move it over to where the thumb is actually anatomically situated on the hand. I successfully completed to top of glove but then frogged back and re-knit the edging on 3.25 mm
needles to make it fit tightly enough around Mel’s palm.
This is a free pattern and not for the faint-hearted novice. It is a
little primitive in its writing style only detailing the cable section
and describing where to place it. It requires some intuitive decisions
that only come from years of experience. (That said, it is a lovely
design).
I love how the colours spiral around this. It makes me happy just to look at it.
The second mitt took only two days with no fuss and drama attached! I need to dye more yarn! it’s eleventy times more fun to knit with your own hand dyed yarn!
Pattern: Lady Jane Grey's Gloves by Sarah Lady
Needles: 3.25 and 3.75mm dpns
Yarn: Hand dyed aran weight machinewash wool.
The children staged a photo shoot for this in a local cafe complete with decadent iced coffee / chocolate beverage. Mel created a personalized unique manicure to highlight her gloves. (Some of my North American virtual knitting friends suggested that these are just the ultimate cosy mitts for winter coffee runs. The kids did the best to recreate this scenario in the middle of an Australian summer).
Showing posts with label dye. Show all posts
Saturday, 28 March 2015
Monday, 5 January 2015
Dyeing the sunset: a photo tutorial for dyeing yarn with food coloring
One of my New Years Resolutions is to learn to dye yarn. So what a better time to dye some yarn than New Year's Day? Messy stuff and holidays go together.
The wonderful font of information that is the internet tells me that the easiest way to dye stuff involves vinegar, food colouring and a microwave. It's so easy that other people even let children participate. I used little bits and pieces of several sets of instructions from blogs and wool manufacturers to get this to work. (I also enlisted the help of my 21 year old child)....
Materials and tools:
Step 1:
Skein up your yarn. I used three balls of aran weight beige / fawnish up-cycled yarn from unraveled jumpers that came from an op shop / charity store / thrift store. For greatest success natural animal fibre is recommended, such as wool, alpaca, angora, etc... This is wool. (And even better it was cheap and I could afford to destroy it potentially if it all went horribly wrong).
I wrapped the yarn around the back of a kitchen chair and tied it off in four places fairly loosely.
Step 2:
Mordant your yarn. A mordant is a substance, typically an inorganic oxide, that combines with a dye or stain and fixes it in a material. This step is essentially preparing the yarn to accept and hold dye. The simplest mordant is vinegar. (Note: This works if you are using food colouring as the dye. If you are using plant based dyes such as onion skins, you need a chemical mordant).
Use equal parts of warm water and white household vinegar soak your yarn thoroughly. (For my skein it was two cups of white vinegar to two cups of warm water). Leave it long enough to soak through properly; at least an hour at minimum but it could be as long as overnight.
Step 3:
Set up for dyeing. Remove the skein from the vinegar solution and wring out gently and pat dry. The yarn should be damp but not dripping. I've covered my kitchen bench with an old towel and then laid a sheet of cling film / plastic wrap on top of this. Then arrange the skein on top of this reasonably spread out and without any major twists and tangles.
Step 4:
Dye the yarn all the pretty colours. This is the fun creative bit. We used yellow and red food coloring as well as very strong black coffee and a mixed berry fruit based tea infusion. I would fondly refer to this as kitchen cupboard dying. The coffee and tea were an experiment that didn't really work out as well as the food coloring. They didn't provide the intensity of color of the food coloring and didn't set and stay as strongly in the finished yarn.
Squirt / dribble the food coloring on the yarn in the pattern of your choice. We've gone for short bands of color here. Mix up specific colors first if you want. There is some orange and purplish red in here as well. We were going for sunset / sunrise colors.
Massage the color well into the yarn. Wear rubber gloves unless you want weird and wonderfully colored hands. You can color the whole skein or leave some gaps of the original yarn color as we did. This takes more food color than you might anticipate. Our one skein used two small half bottles of food coloring, a small cup of strong coffee and about 50 ml of very strong fruit tea infusion. We could definitely have done with more food coloring.
Step 5:
Micronuke the hell out it. Wrap the yarn firmly in the cling film / plastic wrap to make a giant sausage shape. Place in a glass casserole dish or on a microwave proof plate and microwave on your microwave's highest setting. Remove yarn from the microwave and allow to cool. Do not unwrap the yarn. It should look like it does below with condensation on the inside of the plastic film.
Once cool, place the yarn back in the microwave for another 5 minutes. Remove from microwave and allow to cool. Remove and discard the plastic wrap.
Step 6:
Rinse the yarn thoroughly under warm water until the water runs clear. It was at this stage that I realized the coffee and tea hadn't worked as well as I would have like as they rinsed out a lot. (I suspect that they need a chemical mordant as they are essentially plant based dyes). The food coloring held very well.
Drape the yarn to dry in place out of the sun. Mine is on the drying rack in the lounge room.
Step 7:
Photograph the pretty yarn from all its best angles. Once its totally dry make a cool twisted skein or roll into into balls or cakes.
Swatch and see how it knits up. Then plan a pretty project. (This is going to be cabled armwarmers and a matching hat).
One successful New Year's resolution.
The wonderful font of information that is the internet tells me that the easiest way to dye stuff involves vinegar, food colouring and a microwave. It's so easy that other people even let children participate. I used little bits and pieces of several sets of instructions from blogs and wool manufacturers to get this to work. (I also enlisted the help of my 21 year old child)....
Materials and tools:
- Yarn - needs to be 100% natural animal fibre for best results, e.g. wool, alpaca, mohair, angora, cashmere. Acrylic and cotton need different techniques.
- White vinegar
- Food coloring
- Towels, paper towels, old rags, etc... to protect your bench tops from looking like a rainbow.
- Cling film / plastic wrap
- Microwave oven
- Rubber gloves (after all you don't want to dye your hands the color of the rainbow) and an apron if you are a habitually messy cook. The good thing about food coloring is that it does wash out / clean up reasonably well if there are spills.
Step 1:
Skein up your yarn. I used three balls of aran weight beige / fawnish up-cycled yarn from unraveled jumpers that came from an op shop / charity store / thrift store. For greatest success natural animal fibre is recommended, such as wool, alpaca, angora, etc... This is wool. (And even better it was cheap and I could afford to destroy it potentially if it all went horribly wrong).
I wrapped the yarn around the back of a kitchen chair and tied it off in four places fairly loosely.
Step 2:
Mordant your yarn. A mordant is a substance, typically an inorganic oxide, that combines with a dye or stain and fixes it in a material. This step is essentially preparing the yarn to accept and hold dye. The simplest mordant is vinegar. (Note: This works if you are using food colouring as the dye. If you are using plant based dyes such as onion skins, you need a chemical mordant).
Use equal parts of warm water and white household vinegar soak your yarn thoroughly. (For my skein it was two cups of white vinegar to two cups of warm water). Leave it long enough to soak through properly; at least an hour at minimum but it could be as long as overnight.
Step 3:
Set up for dyeing. Remove the skein from the vinegar solution and wring out gently and pat dry. The yarn should be damp but not dripping. I've covered my kitchen bench with an old towel and then laid a sheet of cling film / plastic wrap on top of this. Then arrange the skein on top of this reasonably spread out and without any major twists and tangles.
Step 4:
Dye the yarn all the pretty colours. This is the fun creative bit. We used yellow and red food coloring as well as very strong black coffee and a mixed berry fruit based tea infusion. I would fondly refer to this as kitchen cupboard dying. The coffee and tea were an experiment that didn't really work out as well as the food coloring. They didn't provide the intensity of color of the food coloring and didn't set and stay as strongly in the finished yarn.
Squirt / dribble the food coloring on the yarn in the pattern of your choice. We've gone for short bands of color here. Mix up specific colors first if you want. There is some orange and purplish red in here as well. We were going for sunset / sunrise colors.
Massage the color well into the yarn. Wear rubber gloves unless you want weird and wonderfully colored hands. You can color the whole skein or leave some gaps of the original yarn color as we did. This takes more food color than you might anticipate. Our one skein used two small half bottles of food coloring, a small cup of strong coffee and about 50 ml of very strong fruit tea infusion. We could definitely have done with more food coloring.
Step 5:
Micronuke the hell out it. Wrap the yarn firmly in the cling film / plastic wrap to make a giant sausage shape. Place in a glass casserole dish or on a microwave proof plate and microwave on your microwave's highest setting. Remove yarn from the microwave and allow to cool. Do not unwrap the yarn. It should look like it does below with condensation on the inside of the plastic film.
![]() |
| Looks kind of like some bizarre sausage.... |
Step 6:
Rinse the yarn thoroughly under warm water until the water runs clear. It was at this stage that I realized the coffee and tea hadn't worked as well as I would have like as they rinsed out a lot. (I suspect that they need a chemical mordant as they are essentially plant based dyes). The food coloring held very well.
Drape the yarn to dry in place out of the sun. Mine is on the drying rack in the lounge room.
Step 7:
Photograph the pretty yarn from all its best angles. Once its totally dry make a cool twisted skein or roll into into balls or cakes.
Swatch and see how it knits up. Then plan a pretty project. (This is going to be cabled armwarmers and a matching hat).
One successful New Year's resolution.
Subscribe to:
Posts (Atom)